Friday, September 30, 2011

การทำ Virtual Host บน Apache Web Server

การทำ Virtual Host บน Apache Web Server
ในกรณีที่คุณมี Web Server อยู่หนึ่งตัวแต่ต้องการให้มี host name  (ชื่อของ Web server) อยู่บน Web Server ตัวนี้หลายชื่อ  ก็สามารถทำได้ด้วยการทำ virtual host บนไฟล์คอนฟิกของ apache ซึ่งไฟล์นี้อาจจะอยู่ที่ /etd/httpd/conf/httpd.conf โดยการทำ virtual host มีสองลักษณะคือ:
   1. ทำ IP เดียวให้มีหลาย host
   2. มีหลาย
IP บนเครื่องเดียวและก็มีจำนวน hoat เท่ากับจำนวน IP  ซึ่งอาจจะมีการ์ดแลนหลายการ์ดอยู่บนเครื่อง ๆ เดียว หรือทำการ์ดแลนการ์ดเดียวให้มีหลาย IP ก็ได้  แล้วแต่จะประยุกต์ใช้งานนะครับ

ทำ
IP เดียวให้มีหลาย host  (Using name-based virtual hosts)
ให้ทำการคอนฟิกไฟล์ /etd/httpd/conf/httpd.conf  โดยค้นหาตำแหน่งข้อความที่มีคำว่า <VirtualHost> ซึงอาจจะมีตัวอย่างของการทำ virtual host อยู่แล้ว ซึ่งในตัวอย่างนี้สมมุติว่าคุณมี IP อยู่ค่าเดียวคือ 202.129.16.27 และต้องการจะทำเป็น 2 โฮสต์คือ www.compspot.net กับ mail.compspot.net ก็ทำได้ดังนี้ครับ
NameVirtualHost 202.129.16.27
<VirtualHost 202.129.16.27>
    ServerAdmim webmaster@compspot.net   
    DocumentRoot /var/www/html
    ServerName www.compspot.net
    ErrorLog /etc/httpd/logs/www.compspot.net.error_log.log
   
CustomLog /etc/httpd/logs/www.compspot.net.custom_log.log
</VirtualHost>

<VirtualHost 202.129.16.27>
    ServerAdmin webmaster@
compspot.net   
    DocumentRoot /var/www/mail
    ServerName mail.
compspot.net
    ErrorLog /etc/httpd/logs/mail.compspot.net.error_log.log
   
CustomLog /etc/httpd/logs/mail.
compspot.net.custom_log.log
</VirtualHost>
หลาย IP หลาย Host อยู่บนเครื่องเดียวกันสมมุติว่าในเครื่อง web server มี 2 ip คือ 202.129.16.29 กับ 202.129.16.30 ต้องการทำเป็น 2 Host  คือ www.itwizard.info  กับ mail.itwizard.info ก็สามารถทำได้ดังนี้ :
<VirtualHost 202.129.16.29>
   ServerAdmin webmaster@
compspot.net  
   DocumentRoot /var/www/html
   ServerName www.
compspot.net
   ErrorLog /etc/httpd/logs/www.compspot.net.error_log.log
   CustomLog /etc/httpd/logs/www.
compspot.net.custom_log.log
</VirtualHost>

<VirtualHost 202.129.16.30>
   ServerAdmin webmaster@
compspot.net
   DocumentRoot /var/www/mail
   ServerName mail.
compspot.net
   ErrorLog /etc/httpd/logs/mail.compspot.net.error_log.log
   CustomLog /etc/httpd/logs/mail.
compspot.net.custom_log.log
</VirtualHost>

ในส่วนของ log file นั้นท่านจะไว้ที่ไหนก็ได้ครับ ไม่ต้องทำตามตัวอย่างทั้งหมด

Apache Using 404 Error URL Rewrite - SEO Friendly URL for PHP

Apache Using 404 Error URL Rewrite - SEO Friendly URL for PHPเป็น เทคนิค Apache การเรียกใช้งาน 404 Error (Page Not Found) มาใช้สร้าง URL Rewrite เหมาะสมต่อ SEO Friendly เป็นอย่างยิ่ง ในการกำหนด Keywords ไปกับ URL เทคนิคนี้จะเป็นการนำประโยชน์ของข้อผิดพลากจากการไม่พบ URL นั้น ๆ มาใช้งานในส่วนของ 404 Error ซึ่งใน Apache Web Server สามารถกำหนดคุณสมบัติว่าถ้า URL ที่เรียกบนเว็บเพจไม่มีอยู่จริง จะให้สามารถเรียกค่า Default แสดงข้อผิดพลาดใก้กับผู้ใช้ทราบ และปกติแล้วผู้ใช้ส่วนมากจะกำหนดเป็น 404.html แต่ผมจะเปลี่ยนจาก 404 มาเป็นไฟล์ index.php และใช้คุณสมบัติของ php นำ URL ที่ได้มาใช้งานในการเรียกไฟล์อื่น ๆ มาแสดงบนเว็บเพจ

แก้ Config ของ Apache ในส่วนของ ErrorDocument ครับ

httpd.conf

# Some examples:
#ErrorDocument 500 "The server made a boo boo."
#ErrorDocument 404 /missing.html
#ErrorDocument 404 "/cgi-bin/missing_handler.pl"
#ErrorDocument 402 http://www.example.com/subscription_info.html
#


แก้เป็น


httpd.conf

# Some examples:
#ErrorDocument 500 "The server made a boo boo."
ErrorDocument 404 /index.php
#ErrorDocument 404 "/cgi-bin/missing_handler.pl"
#ErrorDocument 402 http://www.example.com/subscription_info.html
#


Restart Apache ก่อนน่ะครับ

ถ้าจะทำความเข้าใจ ผมยกตัวอย่างเช่น http://localhost/php/install-php.html ถ้า URL นี้ไม่มีอยู่จริง Apache ก็จะทำการเรียกไฟล์ php ขึ้นมาแทน และในไฟล์ index.php ผมใช้คำสั่ง $_SERVER["REQUEST_URI"] ซึ่งจะได้ค่า /php/install-php.html ออกมา และให้นำค่านี้ไปเป็น เงื่อนไขเรียก web page ที่ต้องการ

ถ้ายังงง ๆ อยู่ เดียวมาดูตัวอย่างดีว่าน่ะครับ
** ก่อนอื่นเพื่อความเข้าใจ เราจะต้องรัน script บน path ที่เป็น Root Path ถ้าหากเขียนบน Appserv จะต้องสร้างไฟล์ไว้ที่ C:\Appserv\www หรือจะลองสร้างเป็น Port ใหม่อ่านบทความได้ที่ Apache httpd Create New VirtualHost (Create New Port) ในที่นี่ผมจะทดสอบด้วย port 9999


เริ่มเลยน่ะครับ

ขั้นตอนที่ 1 กำหนด httpd.conf

httpd.conf
# Some examples:
#ErrorDocument 500 "The server made a boo boo."
ErrorDocument 404 /index.php
#ErrorDocument 404 "/cgi-bin/missing_handler.pl"
#ErrorDocument 402 http://www.example.com/subscription_info.html
#


แล้ว Restart Apache


ขั้นตอนที่ 2 ให้สร้างไฟล์มาดังนี้

index.php
1.<?
2.echo $_SERVER['REQUEST_URI'];
3.?>


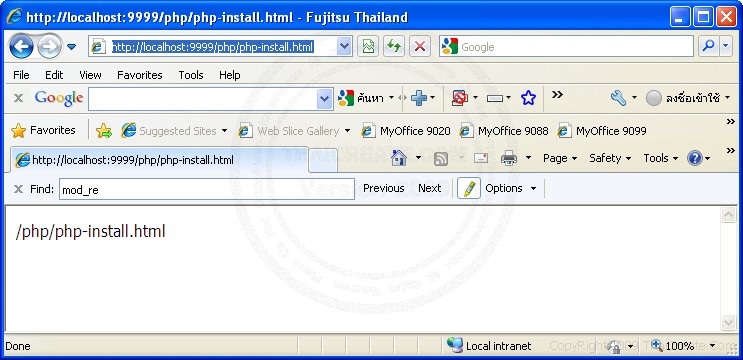
แล้งลองทดสอบโดยรันที่ http://localhost:9999/php/php-install.html


Apache 404 Error URL Rewrite

ผลลัพธ์ทีได้คือ /php/php-install.html ซึ่งสามารถนำไป split หรือตัดเป็นค่าตัวแปรไปใช้งานได้เลยครับ


มาดู Code เต็ม ๆ น่ะครับ

index.php
01.<?
02.header('HTTP/1.1 200 OK');
03.header("Status: 200 OK");
04. 
05.echo "Now URL = ".$_SERVER['REQUEST_URI'];
06. 
07. 
08.//*** Link Page ***//
09.echo "<hr>";
10.echo "<a href=/hello.html>Hello PHP</a> , <a href=/config.html>Config PHP</a> , <a href=/install.html>Install PHP</a>";
11.echo "<hr>";
12. 
13. 
14.//*** Include Content ***//
15. 
16.if($_SERVER['REQUEST_URI'] == "/hello.html")
17.{
18.require("hello.php");
19.}
20.elseif($_SERVER['REQUEST_URI'] == "/config.html")
21.{
22.require("config.php");
23.}
24.elseif($_SERVER['REQUEST_URI'] == "/install.html")
25.{
26.require("install.php");
27.}
28.else
29.{
30.// Default include;
31.}
32.?>


hello.php
01.<?
02.echo "
03.Hello PHP<br>
04.Hello PHP<br>
05.Hello PHP<br>
06.Hello PHP<br>
07.Hello PHP<br>
08.Hello PHP<br>
09.Hello PHP<br>
10.Hello PHP<br>
11.Hello PHP<br>
12.Hello PHP<br>
13.Hello PHP<br>
14.Hello PHP<br>
15.";
16.?>


config.php
01.<?
02.echo "Config PHP<br>
03.Config PHP<br>
04.Config PHP<br>
05.Config PHP<br>
06.Config PHP<br>
07.Config PHP<br>
08.Config PHP<br>
09.Config PHP<br>
10.Config PHP<br>
11.Config PHP<br>
12.Config PHP<br>
13.Config PHP<br>";
14.?>


install.php
01.<?
02.echo "Install PHP<br>
03.Install PHP<br>
04.Install PHP<br>
05.Install PHP<br>
06.Install PHP<br>
07.Install PHP<br>
08.Install PHP<br>
09.Install PHP<br>
10.Install PHP<br>
11.Install PHP<br>
12.Install PHP<br>
13.Install PHP<br>";
14.?>


Apache 404 Error URL Rewrite


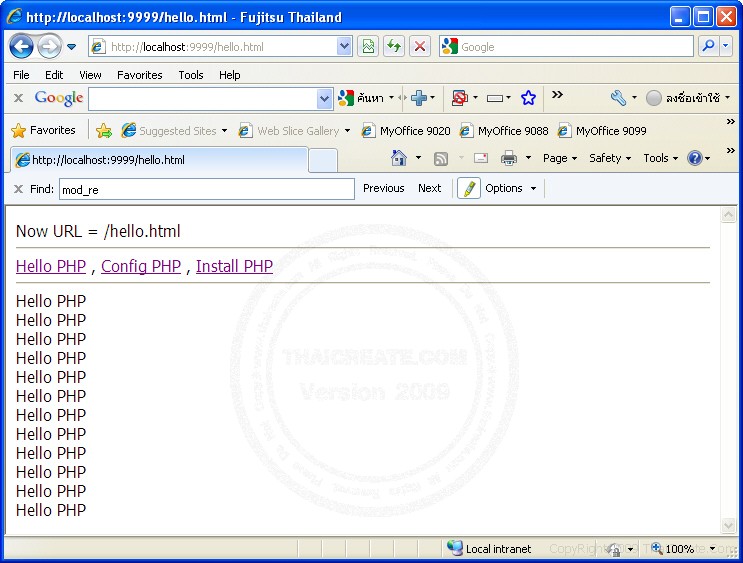
จากตัวอย่างจะเห็นว่า ผมได้ส่ง URL เป็น .html ซึ่งไฟล์นี้ไม่มีอยู่จริง และโปรแกรมจะทำการเรียกไฟล์ index.php และในไฟล์ index.php ผมได้กำหนดเงื่อน
ไขในการเรียกไฟล์ต่าง ๆ มาแสดง ในตัวอย่างผมได้กำหนดเพียง path เดียว ไม่ได้มี sub ย่อยแต่อย่างใด ซึ่งทั้งนี้สามารถดัดแปลงให้ใช้ได้หลายหลายและความซับซ้อนครับ
เช่น http://localhost:9999/php/forum/12345.html เป็นต้น

หลายท่านอาจจะยังส่งสัยน่ะครับว่าถ้านำไปใช้งานจริง จะแก้ httpd.conf ได้อย่างไร อีนนี้เมื่อใช้บน Host ทีเป็น Linux ที่ใช้ Apache เป็น Web Server ให้กำหนดได้ที่ .htaccess
โดยสร้างไฟล์ขึ้นมาใหม่ หรือถ้ามีอยู่แล้วก็แก้ไขเพิ่มเข้าไปครับ (.htaccess ถุกจัดเก็บไว้ที่ home/root directory)

.htaccess
<IfModule mod_rewrite.c>
RewriteEngine On
ErrorDocument 404 /index.php
</IfModule>


และก็อย่าลืมใส่

1.<?
2.header('HTTP/1.1 200 OK');
3.header("Status: 200 OK");
4.?>


ในส่วนของ index.php ด้วยน่ะครับ เฉพาะไม่ฉะนั้น Bot ต่างๆ จะมองว่า Page ที่แสดงนั้นเป็น 404 ซึ่งจะไม่ถูก index ลงใน Database ของระบบ Search เลย

Apache httpd Create New VirtualHost (Create New Port)

Apache httpd Create New VirtualHost (Create New Port) การเพิ่ม VirtualHost หรือ สร้าง Port ใหม่ Apache Web Server ในการเรียกใช้งาน Virtual Directory ในปกติแล้วค่า Default ของ Apache จะทำงานบน Port 80 และ Web Browser ก็จะทำงานเรียก Port 80 เป็นค่า Default เช่นเดียวกัน ซึ่งทำให้เราสามารถเรียก เว็บได้โดยตรง โดยไม่ต้องระบุ port 80 (http://localhost:80/)


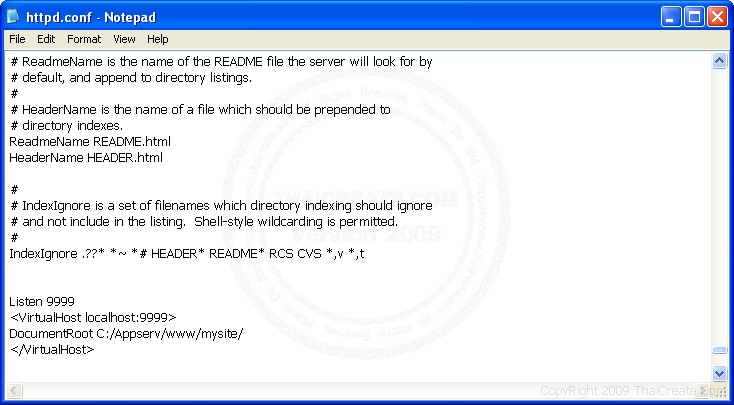
ตัวอย่างนี้ผมได้ยกตัวอย่างการสร้าง Port ใหม่บน Apache เพื่อไว้สำหรับใช้งานในการทดสอบเว็บไซต์ ซึ่งจะแยกการทำงานกับ port 80 และยังสามารถกำหนดเป็น Root Directory ของ Port นั้น ๆ ได้ การสร้าง Port ก็ไม่ยากเลยครับ เพียงเปิดไฟล์ httpd.conf แล้วเพิ่มคำสั่ง

httpd.conf

Listen 9999
<VirtualHost localhost:9999>
DocumentRoot C:/Appserv/www/mysite/
</VirtualHost>


ระบุหมายเลข Port และ Document Root ครับ

Apache Create VirtualHost

จากนั้นก็ให้ทำการ Restart apache ก่อนน่ะครับ

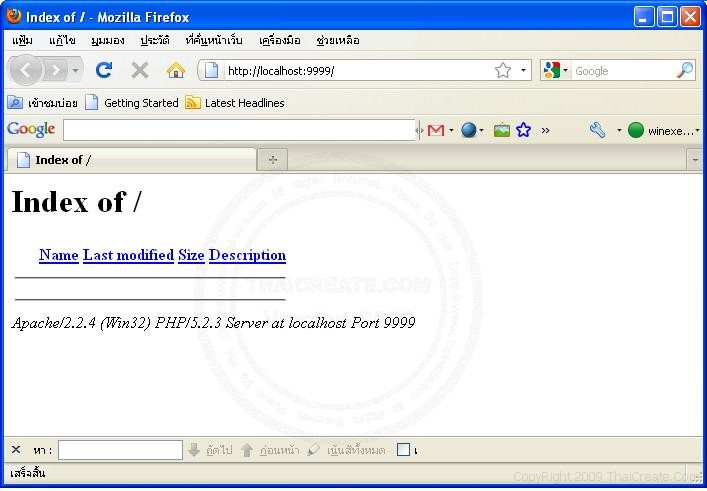
หลังจากที่ Restart Apache แล้วให้ทำการทดสอบการทำงานโดยรันที่ http://localhost:9999/

Apache Create VirtualHost

เพียงแค่นี้เราก็จะได้ Port ใหม่ซึ่งเป็น Root Directory ที่ไม่ต้องไปเกี่ยวข้องกับ Document Root หลักของ Web Server เลยครับ

หัวข้อที่ผมแนะนำที่น่าอ่านมาก


--------------------------------------------------

#Config DNS(Domain Name System) Redhat9.0

Config DNS(Domain Name System) Redhat9.0 ...
     DNS เป็นพื้นฐานของServer ถ้ายัง Config ไม่เป็นก็ต้องพยายามให้มากหน่อยเพราะบางทีก็  
  ง่ายๆ แค่5 นาทีก็ได้ แต่บางทีก็เป็นวันเหมือนกันจากประสบการณ์ที่ทำมา หลายเครื่อง
ปัญหาต่างกันออกไปแต่สุดท้ายแนะนำว่าขอให้ทำให้ได้ก็พอ ตัวที่เขียนนี้ได้ทดลองกับ
8.0 และ9.0 แล้ว ก็ใช้ได้ดี

 
  SOA = (Start to authority)
NS = (Name Server)
A = (Address)
PTR = (Pointer)
MX = (Mail Exchanger)
CNAME = (Canocical Name)

File ที่ต้อง Config และเกี่ยวข้อง มีดังนี้ named.conf , named.ca , named.local
ถ้าหาไม่เจอใช้คำสั้ง #find / -name named.conf ค้นหา
ส่วนใหญ่จะอยู่ที่ /etc/

ขั้นที่ 1
#vi named.conf
options {
directory "/var/named";
};
controls {
inet 127.0.0.1 allow { localhost; } keys { rndckey; };
};

zone "." IN {
type hint;
file "named.ca";
};

zone "localhost" IN {
type master;
file "localhost.zone";
allow-update { none; };
};

zone "0.0.127.in-addr.arpa" IN {
type master;
file "named.local";
allow-update { none; };
};


- ส่วนที่เพิ่มใน named.conf

zone "evekm02.com" IN {
type master;
file "evekm02.com.zone";
allow-update { none; };
};

zone "101.168.192.in-addr.arpa" IN {
type master;
file "192.168.101.zone";
allow-update { none; };
};

-------------------------------------------------------------------------
กรณีเพิ่มหลาย dns
[root@li7 etc]# vi named.conf

file "localhost.zone";
allow-update {none;};
};
zone "0.0.127.in-addr.arpa" IN {
type master;
file "named.local";
allow-update {none;};
};
zone "evekm7.com" IN {
type master;
file "evekm7.com.zone";
allow-update {none;};
};
zone "evekm7-2.com" IN {
type master;
file "evekm7-2.com.zone";
allow-update {none;};
};
zone "evekm7-3.com" IN {
type master;
file "evekm7-3.com.zone";
allow-update {none;};
};
zone "evekm7-4.com" IN {
type master;
file "evekm7-4.com.zone";
allow-update {none;};
};
zone "evekm7-5.com" IN {
type master;
file "evekm7-5.com.zone";
allow-update {none;};
};
zone "evekm7-6.com" IN {
type master;
file "evekm7-6.com.zone";
allow-update {none;};
};
zone "101.168.192.in-addr.arpa" IN {
type master;
file "192.168.101.zone";
allow-update {none;};
};
include "/etc/rndc.key";


------------------------------------------------------------------------
ตัาอย่าง evekm.com.zone อีกแบบ
$TTL 86400
@ IN SOA li9.evekm.com. root.li9.evekm.com. (
1997022700 ; serial
28800 ; Refresh
14400 ; Retry
3600000 ; Expire
86400 ) ; Minimum
IN NS li9.evekm.com.
;
; Machines for evekm.com
;
li9 IN A 192.168.101.9
mail IN A 192.168.101.9

;
; Alias(es)
;
www IN CNAME mail.evekm.com.

;
; Domain mailing address
;
evekm.com. IN MX 10 li9.evekm.com.
evekm.com. IN A 192.168.101.9

--------------------------------------------------------------------------
อีกแบบ
[root@hosting named]# cat eve.co.th.zone
@ IN SOA eve.co.th. root.eve.co.th. (
2003082701 ; serial (d. adams)
10800 ; refresh
3600 ; retry
432000 ; expiry
86400 ) ; minimum
IN NS ns1.store2you.com.
IN MX 10 mail.eve.co.th.
IN A 203.151.217.99
www IN A 203.151.217.99
mail IN A 203.151.217.99
mailadmin IN A 203.151.217.99

-----------------------------------------------------------------------------
อีกแบบ
[root@hosting named]# cat linuxstep.com.zone
@ IN SOA linuxstep.com. root.linuxstep.com. (
2004011901 ; serial (d. adams)
10800 ; refresh
3600 ; retry
432000 ; expiry
86400 ) ; minimum
IN NS ns1.store2you.com.
IN MX 10 mail.linuxstep.com.
IN A 203.151.217.99
www IN A 203.151.217.99
mail IN A 203.151.217.99
mailadmin IN A 203.151.217.99
ns1 IN A 203.151.217.99

--------------------------------------------------------------------------
อีกแบบ
[root@hosting named]# cat store2you.com.zone
@ IN SOA store2you.com. root.store2you.com. (
2003082701 ; serial (d. adams)
10800 ; refresh
3600 ; retry
432000 ; expiry
86400 ) ; minimum
IN NS ns1.store2you.com.
IN NS ns2.store2you.com.
IN MX 10 mail.store2you.com.
IN A 203.151.217.99
www IN A 203.151.217.99
webmail IN A 203.151.217.99
dns IN A 203.151.217.99
dns2 IN A 203.151.217.99
mail IN A 203.151.217.99
ns1 IN A 203.151.217.99
ns2 IN A 203.151.217.99
chotika IN A 203.151.217.99
mysql IN A 203.151.217.99

------------------------------------------------------------------------
ขั้นที่ 2

จากนั้นทำการเพิ่มไฟล์ใน /var/named/
2 .1ทำการสร้างไฟล์ evekm02.com.zone

ตัวอย่าง evekm02.com.zone

$TTL 86400
@ IN SOA li2.evekm02.com. root.li2.evekm02.com. (
1997022700 ; Serial yyyy/mm/dd/counter
28800 ; Refrsh
14400 ; etry
3600000 ; Expire
86400 ) ; Minimum
IN NS li2.evekm02.com.
IN MX 10 li2.evekm02.com.
li2 IN A 192.168.101.2
mail IN A 192.168.101.2
www IN CNAME mail.evekm02.com.


ขั้นที่ 3
ต่อไปก็ทำการสร้างไฟล์ใน /var/named/ อีก
สร้างไฟล์ Zone.192.168.101

ตัวอย่าง 192.168.101.zone
$TTL 86400
@ IN SOA li2.evekm02.com. root.li2.evekm02.com. (
1997022700 ; Serial
28800 ; Refresh
14400 ; Retry
3600000 ; Expire
86400 ) ; Minimum
IN NS li2.evekm02.com.
2 IN PTR li2.evekm02.com.

ขั้นที่ 4
ทำการสร้างไฟล์ named.local ใน /var/named/
ตัวอย่าง named.local

$TTL 86400
@ IN SOA li2.evekm02.com. root.li2.evekm02.com. (
1997022700 ; Serial
28800 ; Refresh
14400 ; Retry
3600000 ; Expire
86400 ) ; Minimum
IN NS li2.evekm02.com.

1 IN PTR localhost.

ขั้นที่ 5
[root@li2 named]# ls -al
total 40
drwxr-xr-x 2 named named 4096 Aug 1 12:43 .
drwxr-xr-x 23 root root 4096 Jul 30 12:51 ..
-rw-r--r-- 1 root root 453 Jul 30 10:58 192.168.101.zone
-rw------- 1 root root 12288 Jul 30 10:40 .192.168.101.zone.swp
-rw-r--r-- 1 root root 601 Jul 30 10:57 evekm02.com.zone
-rw-r--r-- 1 named named 195 Jun 23 2002 localhost.zone
-rw-r--r-- 1 named named 2769 Jun 23 2002 named.ca
-rw-r--r-- 1 named named 449 Jul 30 10:56 named.local

เสร็จแล้วก็ตรวจสอบ named ว่ามี error หรือเปล่า ด้วยคำสั่ง named-checkconf
ถ้ามี error ก็แก้ ตามบรรทัดที่แสดง แต่อย่าลืมเปิด service named ด้วยนะครับ

#service named restart
#service named start
#service named stop


ขั้นที่ 6

ที่ หน้าจอ(windows)kde . System settings -> Network ( Redhat 8)
6 .1 ไปที่ Host (ดูด้วยว่า lan card active หรือยัง)
- กด Add
Address 192.168.101.2
Hostname li2.evekm02.com
Aliases li2

6 .2 ไป DNS
- Hostname li2.evekm02.com
- Primary DNS 192.168.101.2
6 .3 กดปุ่ม Apply

ขั้นที่ 7
พิมพ์ nslookup เพื่อเป็นการตรวจสอบการ set DNS ว่าสามารถทำงานได้หรือไม่
ก่อนอื่นเราต้องทำการ Start Service named ก่อน
พิมพ์ nslookup
Set type=Any
www.evekm02.com
192.168.101.2

ตัวอย่าง
[root@li2 named]# service named start
Starting named: [ OK ]
[root@li2 named]# nslookup
Note: nslookup is deprecated and may be removed from future releases.
Consider using the `dig' or `host' programs instead. Run nslookup with
the `-sil[ent]' option to prevent this message from appearing.
> Set type=Any
> www.evekm02.com
Server: 192.168.101.2
Address: 192.168.101.2#53
www.evekm02.com canonical name = mail.evekm02.com.
> 192.168.101.2
Server: 192.168.101.2
Address: 192.168.101.2#53

2.101.168.192.in-addr.arpa name = li2.evekm02.com.
 เพิ่มเติม
[root@li9 named]# host www.evekm.com
www.evekm.com is an alias for mail.evekm.com.
mail.evekm.com has address 192.168.101.9
[root@li9 named]# host www.linuxstep.com
www.linuxstep.com has address 203.151.217.99
[root@li9 named]# host www.yahoo.com
www.yahoo.com is an alias for www.yahoo.akadns.net.
www.yahoo.akadns.net has address 66.94.230.33
www.yahoo.akadns.net has address 66.94.230.34
www.yahoo.akadns.net has address 66.94.230.37
www.yahoo.akadns.net has address 66.94.230.39
www.yahoo.akadns.net has address 66.94.230.42
www.yahoo.akadns.net has address 66.94.230.44
www.yahoo.akadns.net has address 66.94.230.45
www.yahoo.akadns.net has address 66.94.230.46

์์NIS(Network Information System)

#pico -w /etc/resolv.conf

อย่าลืมตรวจไฟล์ /etc/hosts
li7#pico -w /etc/hosts
# Do not remove the following line, or various programs
# that require network functionality will fail.
127.0.0.1 localhost.localdomain localhost
192.168.101.9 li9.evekm.com li9
192.168.101.9 li9.linuxstep.com linuxstep
#192.168.101.123 rugby.steplinux.com www.steplinux.com mail.steplinux.com


BIND (Berkeley Internet Name Daemon)
SAM (Security Access Monitor)
ข้อมูลอ้างอิง
http://www.tldp.org/HOWTO/DNS-HOWTO.html
http://www.linux.org/docs/ldp/howto/DNS-HOWTO.html

wn@eve.co.th วันที่ 07/05/2547-2554

How to Setup a DNS Server on CentOS 5

This is a pretty geeky thing to do but running your own DNS Server on your intranet does make some sense from a performance and conveience perspective.
Background
The sole purpose of a DNS Server is to provide a look-up service for mapping hostnames e.g. www.google.com to IP addresses 100.101.20.2. By far the most popular DNS Server software out there is a package called bind.
There are essentially 2 reasons to running your own DNS Server.
  1. Improving the speed of hostname lookups
  2. Managing your own intranet hostnames & IP addresses in a central location
The first reason is what is commonly called a Caching Name Server. In essence by having one machine provide all hostname look-ups in your intranet, you’re cutting down on every machine in your intranet having to independently look-up names. Additionally once a name is looked up your DNS Server will cache the results for a set period of time so that subsequent queries can come out of your DNS Server’s cache and not have to go and do the look-up on your ISPs DNS Server.
The second reason is actually the cooler one. Since you control the DNS Server you can create your own local domain (called zones in bind lingo) and name all the systems within your intranet. In so doing this it’s much easier to connect to systems using names rather than IP addresses. Plus it’s fun to name all the systems!
Taking this a step further you can create generic hostnames such as imap, mail, smtp, ntp, pop, etc. and manage these in one stop rather than having to manage them throughout your intranet.
Getting started
First things first, install the necessary bind software.
1
yum install bind bind-utils bind-libs

Generating a rndc key
NOTE: All the config files we’re going to work on are located in /var/named/chroot

Next you’ll need to create/modify a rndc.conf and/or rndc.key file. This file contains a key which is required in order to manage the bind service once it’s up and running. With this key you can theoretically manage bind either on the host where it’s running or you can manage it on any system that is allowed to do so and knows this key!
1
2
# command to generate a new 512 byte key
rndc-confgen -b 512
This command will return the following output which you’ll want to either redirect to a file or copy and paste into a file. The file should be rndc.conf but I like to use this name instead, /var/named/chroot/etc/rndc.key. It just makes more sense to me.
1
2
3
4
5
6
7
8
9
10
11
12
# Start of rndc.conf
key "rndckey" {
        algorithm hmac-md5;
        secret "nHFS3WOpdap75IvsYSXVNYWusnAQPT6z5XC8V5YPWXnZ8RN8tdfSFuClZ8nNouWyGhvHB8mETJgwsrvhiYhIhA==";
};
 
options {
        default-key "rndckey";
        default-server 127.0.0.1;
        default-port 953;
};
# End of rndc.conf
The rndc-confgen command also returns some additional output below. This goes into the file /var/named/chroot/etc/named.conf. Make sure to remove the comments at the beginning of each line to turn them on.
1
2
3
4
5
6
7
8
9
10
11
# Use with the following in named.conf, adjusting the allow list as needed:
key "rndckey" {
      algorithm hmac-md5;
      secret "nHFS3WOpdap75IvsYSXVNYWusnAQPT6z5XC8V5YPWXnZ8RN8tdfSFuClZ8nNouWyGhvHB8mETJgwsrvhiYhIhA==";
};
# 
controls {
      inet 127.0.0.1 port 953
      allow { 127.0.0.1; } keys { "rndckey"; };
};
# End of named.conf
named.conf file
Now let’s flesh out that named.conf file a little bit more.
1
2
3
4
5
6
7
8
9
10
11
12
13
14
15
16
17
18
19
20
21
22
23
24
25
26
27
28
29
30
31
32
33
34
35
36
37
38
39
40
41
42
43
44
45
46
47
48
49
50
51
52
53
54
55
acl lan {   
        192.168.1.0/24;
        127.0.0.1;
};
 
controls {
        inet 127.0.0.1 port 953
        allow { lan; } keys { "rndckey"; };
};
 
logging {
        category default { default_syslog; };
        category lame-servers { null; };
};
 
options {
        pid-file "/var/run/named/named.pid";
        directory "/var/named";
        dump-file "named_dump.db";
        forward only;
        forwarders {
        # the following IP addresses are my ISPs DNS Servers. These will be used for looking up
        # hostnames that I don't locally manage, i.e. the REST OF THE INTERNET!
        24.92.226.40;     # my ISPs DNS Server #1
        24.92.226.41;     # my ISPs DNS Server #2
        };
        /*
         * If there is a firewall between you and nameservers you want
         * to talk to, you might need to uncomment the query-source
         * directive below.  Previous versions of BIND always asked
         * questions using port 53, but BIND 8.1 uses an unprivileged
         * port by default.
         */
        query-source address * port 53;
        allow-query { lan; };
        allow-recursion { lan; };
        allow-transfer { lan; };
};
 
zone "bubba.net"{
        type master;
        file "data/db.bubba.net";
};
zone "0.0.127.in-addr.arpa"{
        type master;
        file "data/db.127.0.0";
};
zone "1.168.192.in-addr.arpa"{
        type master;
        file "data/db.192.168.1";
};
zone "." {
        type hint;
        file "root.hints";
};
Here is a quick rundown of what’s going on here. The acl lan creates an access control list that includes 192.168.1.0/24 and 127.0.0.1 so that only hosts within these IP address ranges can remotely manage and use this bind instance. 192.168.1.0/24 means IP addresses in the range 192.168.1.1 – 192.168.1.255.
The zones, “bubba.net”, “0.0.127.in-addr.arpa”, “1.168.192.in-addr.arpa”, and “.” are all essentially files containing either hostname → IP address mappings or IP address → hostname mappings that this bind server will be responsible for.
Bulding zone files
The first zone: “bubba.net” includes all the hostnames and the IP addresses they point to. So these would be my systems:
  • scully.bubba.net
  • mulder.bubba.net
  • doggett.bubba.net
The second and third zones: “0.0.127.in-addr.arpa” and “1.168.192.in-addr.arpa” are special zones that provide “reverse” name look-ups. These are when you look up a IP address and want to know what name(s) are associated with it. For example:
  • 192.168.1.100
  • 192.168.1.101
The fourth zone: “.” is a special zone that makes this bind server act as a caching name server, for any hostnames and IP addresses that fall outside of the first 3 zones. These hostname and IP address look-ups will be forwarded to my ISPs DNS Server, and the results cached here for subsequent quereies.
Here is what the zone “bubba.net” looks like.
1
2
3
4
5
6
7
8
9
10
11
12
13
14
15
16
17
18
19
20
21
22
23
24
25
26
27
28
29
30
31
32
33
34
35
36
37
38
39
$TTL 604800
;
; Zone file for bubba.net
;
; Mandatory minimum for a working domain
;
@   IN  SOA ns.bubba.net. hostmaster.bubba.net. (
      2000072802 ; serial
      28800 ; refresh
      7200 ; retry
      3600000 ; expire
      86400 ; default_ttl
      )
@   IN  NS      ns.bubba.net.
@   IN  MX  10  mail.bubba.net.
@   IN  MX  20  mail.bubba.net.
;
; Provide familiar names to services but
; acutally all are coming from XXXXX
; These need to be bound to the address directly, no CNAME's.
; -----------------------------------------------------------
bubba.net.              IN  A 192.168.1.1
;
hostmaster.bubba.net.   IN  A 192.168.1.101
ns.bubba.net.           IN  A 192.168.1.101
...
...
; Subnet 192.168.1 machines
; -------------------------
mulder.bubba.net.       IN  A         192.168.1.1
mulder.bubba.net.       IN  HINFO     "AMD Athlon(tm) Dual Core Processor 4850e 2.2GHz" "LINUX"
mulder.bubba.net.       IN  MX        10  mail.bubba.net.
mulder.bubba.net.       IN  TXT       ""
scully.bubba.net.       IN  A         192.168.1.2
scully.bubba.net.       IN  HINFO     "Celeron 450" "Windows 2000"
scully.bubba.net.       IN  MX        10  mail.bubba.net.
scully.bubba.net.       IN  TXT       ""
...
...
The first 16 lines are pretty standard. These setup a TTL or Time To Live which means how long any of this data should be cache. Line 14 denotes which machine is the SOA, Start of Authority, ns.bubba.net is the master of this domain is what it’s saying 8-). Lines 15 & 16 state which machine is the mail exchange for this domain. I only have one mail exchange so I just list it twice.
The most important section in this file starts with the declaration of hostnames. Each hostname gets 4 lines. A “IN A” line which tells you the IP address for this hostname. The “IN HINFO which is just a description of the host itself. The “IN MX” states who the mail exchange is for this host. And finally the “IN TXT line which I’m not going to get into today but it is important later on when you’re setting up you mail server.
Here is what the zone “db.192.168.1″ looks like.
1
2
3
4
5
6
7
8
9
10
11
12
13
14
15
$TTL 604800
@   IN  SOA ns.bubba.net. hostmaster.bubba.net. (
      2000072801 ; serial
      28800 ; refresh
      7200 ; retry
      604800 ; expire
      86400 ; default-ttl
      )
@   IN  NS  ns.bubba.net.
;
101   IN  PTR mulder.bubba.net.
102   IN  PTR scully.bubba.net.
103   IN  PTR doggett.bubba.net.
...
...
The first 9 lines are essentially stating how long any Caching DNS Name Server should cache this data before getting a fresh copy. The SOA ns.bubba.net is saying which machine is the authority for this domain. The hostmaster.bubba.net is actually an email address that is responsible for this domain, hostmaster@bubba.net.
Finally the zone “db.127.0.0″ which really serves no purpose other than as a backup in case a host didn’t configure itself correctly with the loopback address. Here is what my zone file looks like:
1
2
3
4
5
6
7
8
9
10
11
$TTL 604800
@               IN      SOA     ns.bubba.net.   hostmaster.bubba.net. (
                        2000031801 ; serial
                        28800 ; refresh
                        7200 ; retry
                        604800 ; expire
                        86400 ; default_ttl
                        )
@               IN      NS      ns.bubba.net.
;
1               IN      PTR     localhost.bubba.net.
The zone “.” uses a file called root.hints. Here is an example of what this file looks like.
1
2
3
4
5
6
7
8
9
10
11
12
13
14
15
16
17
18
19
20
21
22
23
24
25
26
27
28
29
30
31
32
33
34
35
36
37
38
39
40
41
42
43
44
45
; <<>> DiG 9.3.4-P1 <<>> @e.root-servers.net . ns
; (1 server found)
;; global options:  printcmd
;; Got answer:
;; ->>HEADER<<- opcode: QUERY, status: NOERROR, id: 21247
;; flags: qr aa rd; QUERY: 1, ANSWER: 13, AUTHORITY: 0, ADDITIONAL: 14
 
;; QUESTION SECTION:
;.                              IN      NS
 
;; ANSWER SECTION:
.                       518400  IN      NS      D.ROOT-SERVERS.NET.
.                       518400  IN      NS      C.ROOT-SERVERS.NET.
.                       518400  IN      NS      G.ROOT-SERVERS.NET.
.                       518400  IN      NS      L.ROOT-SERVERS.NET.
.                       518400  IN      NS      F.ROOT-SERVERS.NET.
.                       518400  IN      NS      I.ROOT-SERVERS.NET.
.                       518400  IN      NS      B.ROOT-SERVERS.NET.
.                       518400  IN      NS      J.ROOT-SERVERS.NET.
.                       518400  IN      NS      M.ROOT-SERVERS.NET.
.                       518400  IN      NS      K.ROOT-SERVERS.NET.
.                       518400  IN      NS      H.ROOT-SERVERS.NET.
.                       518400  IN      NS      A.ROOT-SERVERS.NET.
.                       518400  IN      NS      E.ROOT-SERVERS.NET.
 
;; ADDITIONAL SECTION:
A.ROOT-SERVERS.NET.     3600000 IN      A       198.41.0.4
A.ROOT-SERVERS.NET.     3600000 IN      AAAA    2001:503:ba3e::2:30
B.ROOT-SERVERS.NET.     3600000 IN      A       192.228.79.201
C.ROOT-SERVERS.NET.     3600000 IN      A       192.33.4.12
D.ROOT-SERVERS.NET.     3600000 IN      A       128.8.10.90
E.ROOT-SERVERS.NET.     3600000 IN      A       192.203.230.10
F.ROOT-SERVERS.NET.     3600000 IN      A       192.5.5.241
F.ROOT-SERVERS.NET.     3600000 IN      AAAA    2001:500:2f::f
G.ROOT-SERVERS.NET.     3600000 IN      A       192.112.36.4
H.ROOT-SERVERS.NET.     3600000 IN      A       128.63.2.53
H.ROOT-SERVERS.NET.     3600000 IN      AAAA    2001:500:1::803f:235
I.ROOT-SERVERS.NET.     3600000 IN      A       192.36.148.17
J.ROOT-SERVERS.NET.     3600000 IN      A       192.58.128.30
J.ROOT-SERVERS.NET.     3600000 IN      AAAA    2001:503:c27::2:30
 
;; Query time: 109 msec
;; SERVER: 192.203.230.10#53(192.203.230.10)
;; WHEN: Fri Feb 20 03:49:01 2009
;; MSG SIZE  rcvd: 500
Starting bind up
Once you have all this in place you can start up bind with this command.
1
/etc/init.d/named start
Configuring a host to use your DNS server
One final step is to configure your host to use your newly setup DNS Server as it’s name server. You can accomplish this by changing 2 files. /etc/resolv.conf and /etc/nsswitch.conf.
The /etc/resolv.conf should look like this:
1
2
search bubba.net
nameserver 192.168.1.101
The /etc/nsswitch.conf should have an entry like this in it:
1
2
3
4
5
...
...
hosts:      files dns
...
...
Taking it out for a test drive
You can see if it’s working by poking the name server using host, dig, or nslookup. Here are a couple of example quereies.
1
2
3
4
5
6
7
8
9
10
11
12
13
14
15
16
17
18
19
20
21
22
23
24
25
26
27
28
29
30
31
32
33
34
35
36
37
# host example
% host -l bubba.net
bubba.net name server ns.bubba.net.
bubba.net has address 192.168.1.1
...
...
 
# dig example
% dig ns.bubba.net
 
; <<>> DiG 9.3.4-P1 <<>> ns.bubba.net
;; global options:  printcmd
;; Got answer:
;; ->>HEADER<<- opcode: QUERY, status: NOERROR, id: 54856
;; flags: qr aa rd ra; QUERY: 1, ANSWER: 1, AUTHORITY: 1, ADDITIONAL: 0
 
;; QUESTION SECTION:
;ns.bubba.net.                  IN      A
 
;; ANSWER SECTION:
ns.bubba.net.           604800  IN      A       192.168.1.101
 
;; AUTHORITY SECTION:
bubba.net.              604800  IN      NS      ns.bubba.net.
 
;; Query time: 1 msec
;; SERVER: 192.168.1.101#53(192.168.1.101)
;; WHEN: Sat Feb 28 20:54:46 2009
;; MSG SIZE  rcvd: 60
 
# nslookup example
% nslookup ns.bubba.net
Server:         192.168.1.101
Address:        192.168.1.101#53
 
Name:   ns.bubba.net
Address: 192.168.1.101

Readers who viewed this page, also viewed:

#DNS(Domain Name System)

#คำศัพท์ เกี่ยวกับ DNS

ศัพท์
ความหมาย/หน้าที่
Forward Master Zone
แปลงชื่อ Domain เป็น IP Adress
Reverse Master Zone
แปลง IP Adress เป็นชื่อ Domain
BIND
(Berkeley
Internet
Name Domain)
โปรแกรมให้บริการดีเอ็นเอส ที่ใครๆก็ใช้ เหมือนพิมพ์งานก็ต้อง ms word
bind-utils-9.2.4-2
bind-9.2.4-2
bind-libs-9.2.4-2
ypbind-1.17.2-3
bind-chroot-9.2.4-2
Master Name Sever


Slave Name Server
Name Server มีสองแบบคือ Master Name Sever และ
Slave Name Server ซึ่งจะต้องอยู่ต่างเครื่องกัน

Master Name Server จะอ่านข้อมูลประจำโซนจากแฟ้มใน Disk และมีสิทธิหน้าที่ในโซนนั้นๆ

Slave Name Server สำเนาข้อมูลจาก Master Name Server
named
โปรแกรมบริการชื่อ Domain บน Linux

/usr/sbin/named -u named -t /var/named/chroot
Host
เครื่องคอมพิวเตอร์ศูนย์กลางที่ต่อเข้ากับ Network,Internet เพื่อบริการใดๆ
Domain
ชื่อ web address/computer
ทำให้เข้าใจ/จำง่าย/มีความหมาย กว่า IP Address

ถ้าเรียก โดเมน เหมือนเรียก IP Address

http://www.icann.org/
Sub Domain
ส่วนย่อยของ Domain เช่น mail.dns.linuxstep.com
mail คือ Sub Domain
Localhost
เครื่องเราเอง จะตั้งค่า ip address อะไร แต่เมื่อเรียก
Localhost ก็จะเรียกเครื่องเราเอง

IP Address 127.0.0.1 = Localhost
IP(Internet Protocal)
IP หรือ Internet Protocal
IP Address คือรหัสตัวเลขที่กำหนดขึ้น เพื่อใช้อ้างถึงที่อยู่ของ Host และ Network
ตัวเลขเหล่านี้จะไม่ซ้ำกัน (unique numeric) ซึ่งมีมาตรฐานในการกำหนด และเป็นที่รู้จักทั่วโลก IPV4,IPV6
Port ช่องทาง ที่ใช้ติดต่อกับ computer/อุปกรณ์ ใน network
Loopback

(Address
Localhost)
สำหรับ window กำหนด loopback IP=127.0.0.1 เมื่อส่งสัญญาณออกจะไม่ส่งออกนอกเครือข่าย แต่จะกลับมา
ที่ต้นทาง ด้วย loop back driver

http://www.certiguide.com/netplus/
cg_np_IVLoopbackAddressingandConnections.htm
Root Domain
ลำดับบนสุดของระบบ DNS โดยมีการกำหนดดังนี้
ลำดับที่ 1 root
ลำดับที่ 2 .com, .net, .edu, .gov, .org, .th, ...
ลำดับที่ 3 subdomain ตัวอย่าง mail3.linuxstep.com
mail3 =subdomain

ตัวอย่างลำดับ DNS
www2.dns.linuxstep.com
Name Resolution
การที่ DNS Server เก็บหมายเลข IP Address คู่กับชื่อเครื่องแบบ Domain Name เพื่อทำการค้นหาชื่อตามการร้องขอของเครื่อง         DNS client
DNS Server
เครื่องที่คอยจัดการ/ดูแล/แก้ไข domain subdomain
Client
เครื่องลูกข่าย
Resolver
กลไกการแปลง domain เป็น ip address
Reverse File
/etc/resolve.conf

การ resolve หมายถึง
DNS Zone
การจัด domain เป็นพื้นที่ย่อย
TCP,UDP,ARP

เป็น protocoll ที่ DNS ใช้ในการติดต่อผ่าน port 53

TCP - ปรับปรุงข้อมูล
UDP - ส่งคำขอข้อมูล
ARP - แปลงค่า IP address เป็น Hardware

#Files ที่ใช้ในการ Config
Files Config
ความหมาย / หน้าที่
/etc/named.conf
กำหนดการทำงานของ Name Server สำคัญมาก
/var/named/named.ca เก็บข้อมูลชื่อ Server ซื่งเป็น Root Name Server
ไม่ควรแก้ไขข้อมูลใน file นี้เป็นอันขาด
/var/named/named.local เก็บข้อมูลการ map ชื่อ กับ IP Address แบบ Reverse Lookup
/var/named/dm.com.zone ระบุชื่อ Server,Zone, ทำ Forward Lookup
/var/named/ 203.203.203.203.zone
Reward Lookup
/etc/hosts
เก็บชื่อ host
/etc/resolve.conf
เก็บชื่อ domain และ ip ที่ทำงานแบบ Forward Lookup
/etc/sysconfig/network เก็บชื่อ host ของเครื่อง
/etc/sysconfig/named กำหนดตำแหน่งของ named ที่เป็น file config

#ความหมายของ SOA Resource Record
SOA (Start to authority)
เริ่มให้สิทธิ/อำนาจ
ความหมาย / หน้าที่
@
Domain Name ที่ได้จาก /etc/named.comf
IN Internet
serial
เป็นหมายเลขที่ใช้แสดงการอัพเดทข้อมูลระหว่าง Primary master และ Secondary master
refresh
ระยะเวลา refresh ข้อมูล
retry
ระยะเวลา ตรวจสอบข้อมูลกับ Primary DNS Server
expire
ระยะเวลา หมดอายุ กรณีติดต่อกับ Primary DNS Server ไม่ได้

#ความหมายข้อมูลใน Fields Type DNS Record
Type
ความหมาย / หน้าที่
A
แปลงชื่อ Domain เป็น IP Address แบบ ipv4
NS
Name Server record กำหนดว่า server ใดรับผิดชอบ domain
PTR
Pointer record ใช้ Map IP Address เป็น Host
MX
Mail Exchanger
ใช้ระบุชื่อเครื่อง Mail Server ของ Domain
เมื่อเราต้องกำหนด MX เราจะพบว่าต้องกำหนด
MX 10 mail1.example.com
MX 20 mail2.newdomain.com
ค่าเลข 10 และ20 นั้นหมายถึง Priority ของ Mail โดยค่าน้อยสุดจะสำคัญสุด

ชื่อหลัง MX ต้องเป็น Domain เท่านั้นและไม่ใช่ CName
CNAME
Cononical name ใช้เป็น Alias name ให้เป็น host จริง
เช่น ns,mail,www,www2
;
Remark

#คำสั่ง Linux เกี่ยวกับ DNS

Command
ความหมาย / หน้าที่ / ตัวอย่าง
vi
editor แก้ไข file
named-checkconf
ตรวจ error named.conf
e.g.
#named-checkconf /etc/named.conf
named-checkzone
ตรวจ error zone
e.g.
#named-checkzone lp.com /var/named/lp.com.zone
service network restart
reboot network service
service named restart
reboot named service
nslookup
ค้นหา domain,ip address รวมทั้งข้อมูลต่างๆ

[root@l203 root]# nslookup
> www.li203.com
Server: 203.156.167.203
Address: 203.156.167.203#53
www.li203.com canonical name = l203.li203.com.
Name: l203.li203.com
Address: 203.156.167.203
> 203.156.167.203
Server: 203.156.167.203
Address: 203.156.167.203#53

203.167.156.203.in-addr.arpa name = l203.li203.com.
> mail.li203.com
Server: 203.156.167.203
Address: 203.156.167.203#53

mail.li203.com canonical name = l203.li203.com.
Name: l203.li203.com
Address: 203.156.167.203
dig update ข้อมูลให้ทันสมัย
e.g.
dig > /var/named/named.ca
host
แสดง domain และ ip address
e.g.
[root@l203 root]# host www.li203.com
www.li203.com is an alias for l203.li203.com.
l203.li203.com has address 203.156.167.203

#Forward DNS
ขั้นตอนที่
ความหมาย / หน้าที่
1
แก้ named.conf

zone "domain.com" IN {
type forward;
forwarders { 203.156.138.45; };
};

#Redirect domain
ขั้นตอนที่
ความหมาย / หน้าที่
1
ให้แก้ index.html หรือ index.php

<html>
<head>
<META HTTP-EQUIV="Refresh" CONTENT="5;URL=http://www.domain.com">
</head>
<body>
<center>
ืำnew website
<a href="http://www.domain.com">www.domain.com</a>
</center>
</body>
</html>


จาก www.itwizard.info

การทำเครื่องเป็น Primary DNS หรือ Master DNS
   ทำไมต้องทำ เพราะต้องการให้เครื่องเป็นเครื่องหลักของ dns และอีกเหตุผลก็คือconfig ให้ support กับ Secondary
จากการconfig ธรรมดาแล้วให้กำหนดค่าจาก named.conf

zone "abcd.com" { -->ถ้ากรอก www.abcd.com มาจะเข้า zone นี้
type master; -->เป็นเครื่อง Primary Server หรือ master
file "abcd.com.zone"; -->ไฟล์ที่ทำการ Forward ชื่อเครื่อง ไปเป็น ipของ server
allow-transfer{192.168.101.3;}; -->คำสั่งเพื่อให้ transfer ไปยัง ip address เครื่อง Secondary Server Server เป็นการ ระบุ Domain ที่ต้องการทำ Backup
allow-query{any;}; -->query ทุกๆอย่างที่มีอยู่ใน Primary Server

การทำให้เครื่องเป็น Secondary DNS
   ทำไมต้องทำเมื่อต้องการสำรอง DNS เราต้องรับค่ามาจาก Master DNS ให้กำหนดค่าใน named.conf

zone "abcd.com" {--> ถ้ากรอก www.abcd.com มาจะเข้า zone
type slave; -->เป็นเครื่อง Secondary Server หรือ slave
file "slaves/abcd.com.zone"; -->ไฟล์ที่ทำการ Forward ชื่อเครื่อง ไปเป็น ipของ server อ้างอิงไปยังไฟล์ของเครื่อง Primary Server
masters { 192.168.101.213;}; -->กำหนด ip เครื่อง Primary Server เป็นการ ระบุ Domain ที่ต้องการทำ Backup
allow-query{ any;}; -->query ทุกๆอย่างที่มีอยู่ใน Primary Server
};


เมื่อเราดูจากตำแหน่ง file แล้วเราจะเห็น /slaves
[root@l2023 ~]# cd /var/named/chroot/var/named/
[root@l2023 named]# ll
-rw-r----- 1 root named 448 Mar 11 08:03 202.29.75.zone
-rw-r----- 1 root named 442 Sep 30 2005 203.156.167.zone
-rw-r----- 1 root named 575 Mar 12 06:01 afaps2023.com.zone
drwxrwx--- 2 named named 4096 Aug 26 2004 data
-rw-r----- 1 root named 587 Mar 12 06:28 li2023.com.zone
-rw-r----- 1 root named 195 Sep 30 2005 localhost.zone
-rw-r----- 1 root named 2499 Sep 30 2005 named.ca
-rw-r----- 1 root named 461 Mar 12 06:36 named.local
drwxrwx--- 2 named named 4096 Jul 27 2004 slaves
[root@l2023 named]# cd slaves/
[root@l2023 slaves]# ll
total 0
[root@l2023 slaves]# cd ..
[root@l2023 named]# ls
202.29.75.zone 203.156.167.zone afaps2023.com.zone data li2023.com.zone localhost.zone named.ca named.local slaves
[root@l2023 named]# cd data
[root@l2023 data]# ll
total 0


การทำสอบ Master DNS และ Secondary DNS
#service named restart
ดูภาพ http://www.linuxstep.com/tips/20070410004/dnsserver/image020.jpg

#หลักการทำงานของ DNS

ขั้นตอนที่
ความหมาย / หน้าที่
1
client(ผู้เล่น) ต้องการเข้า www.linuxstep.com เครื่อง client จะขอ IP Address ไปที่ DNS Server (ถ้าไม่พบ IP Address) จะขอ IP Address กับ DNS Server ในลำดับที่สูงกว่า เช่น ISP
2
DNS Server ของ ISP ค้นหา IP Address ต่อไป ถ้าไม่พบ ก็ต้องส่งต่อไปที่
Root Domain Server ที่ Root Domain Server ต้องเจอแน่นอนเพราะเป็นสถานที่สุดท้ายแล้ว
3
เมื่อเจอก็จะได้ IP Address ของ www.linuxstep.com และแจ้งไปที่ Domain Server ของ ISP ทราบ และจัดเก็บไว้ด้วย
4
Domain Server ของ ISP ก็ส่งต่อไปที่ DNS Server ของ Client และแจ้ง IP Address ไปที่ client (ผู้เล่น)
5
เมื่อ client ได้ IP Address ของ www.linuxstep.com แล้ว ก็ติดต่อกับ
IP Address ได้โดยตรง โดยการรับส่งข้อมูลจะใช้ Protocol TCP

#ชื่อเฉพาะที่ได้กำหนดเกี่ยวกับ DNS
.mil
ทหาร
.com
การค้า
.gov
รัฐบาล
.net
internet
.info
ข้อมูล ข่าวสาร
.org องค์กร
.edu การศึกษา
.co บริษัท
.arts ศิลปะ
.rec องค์กร
.nom บุคคลทั่วไป
.web websote
.ac สถานศึกษา
.store บริษัทที่ทำการค้า

FAQ

คำถามที่พบบ่อยเกี่ยวกับ DNS
คำถาม
ตอบ
1. port ใดที่ใช้กับ DNS
53
2.หน่วยงานใดรับผิดชอบ DNS
ระดับโลก คือ Internic
ประเทศไทย คือ thnic
3. TT L คืออะไร
Tile To Live เวลาที่กำหนดให้ปรับปรุงข้อมูลเป็น วินาที
4. DNS ย่อมาจาก
Domain Name System

บางคนก็เขียน Domain Name Service ซึ่งผมเห็นไม่มากแต่ก็
เห็นในหนังสือบางเล่ม ใครตอบได้ช่วยบอกทีครับ
5 ip address 1 ตัว กำหนดให้ได้
หลาย domain ได้หรือไม่
ตามหลักการ DNS ของ Linux ทำได้ครับ เพราะใช้ Virtual แทน
กรณีมีหลายชื่อ domain
6.โปรแกรมอะไรจัดการ DNS ถ้า Redhat คือ bind

ถ้าเป็น centOS5
bind-chroot-9.3.3-10.el5
system-config-bind-4.0.3-2.el5.centos
ypbind-1.19-8.el5
bind-9.3.3-10.el5
bind-utils-9.3.3-10.el5
kdebindings-3.5.4-1.fc6
bind-libs-9.3.3-10.el5
7.การศึกษาการทำ DNS ยากหรือไม่เพราะบางคนไม่สามารถ แก้ได้ ยากหรือไม่แล้วแต่คน ผมแนะนำครับ
ควรจะมีความตั้งใจและหาคนแนะนำ
8.domain redirect คือ การแปลงชื่อให้สั้นลงหรือให้เป็นชื่ออื่น
10.จำ config อย่างไร ให้ dns
ค้นได้ด้วย google
อยู่ที่การเขียน code html
11.master name server คือ เป็นฐานข้อมูลหลักของ Domain แก้ไขได้ที่เดียว
12.slave name server คือ สำเนาของ master name server
13.root name server คือ ลำดับบนสุดของ domain
14.ใน windows server มีการ
กำหนด dns หรือไม่
มีครับลองไปศึกษาดูได้จาก windows2003 R
15.webmin จัดการ dns มีหรือไม่ มีครับ www.webmin.com , www.rpmfind.net
โปรแกรม caching-nameserver*.rpm


หากคนไทยหันมาฆ่ากันเอง จะร้องเพลงชาติไทยให้ใครฟัง 


Design by GURU